
So you have decided to give the Ghost blogging platform a try. Like me, after a quick Google search, you may have realized that the only real fully managed hosting service available for a Ghost blog is Ghost(Pro) which starts at $36/month. I didn’t want to spend that kind of money on a brand new blog with no subscribers and thankfully, you don’t have to.
DigitalOcean, a company that provides a cloud platform that prides itself with simplifying developers’ lives, has a very nice offering for people who are just getting started and want to test the waters, bad pun intended. Say hello to the $5/month DigitalOcean Droplet. What’s more, they have made it super relatively easy to setup a Ghost blog on their system, thanks to their “one-click” deploy solution. While the whole process might not actually be as simple as just one click, it is the simplest, and cheapest I could find, out of the other big competitors like Microsoft Azure, Amazon AWS and Google Cloud.
Here is a step by step guide to get a Ghost blog running on DigitalOcean, with your own domain name, and all for less than $7/month.
1. Create DigitalOcean account
The first step to setting up Ghost on DigitalOcean is to create your account. Clicking here to do so will give you a $100, 60-day credit and earn me $25 when you’ll have spent your first $25 with them. It’s a short 3 step process where you’ll be asked to verify your email, enter your billing information and enter the name of your first project. Don’t worry about answering the question about the technologies you plan to use on DigitalOcean, you don’t have to, to complete the sign-up process.
2. Create a droplet
Now that you have your account and project setup, you need to create a Droplet. But before doing that, though it is not technically necessary to do so, I strongly recommend that you set up an SSH key for your account. Learn how to do so in this separate blog post. I omitted that part the first time around and it got me into trouble later on.
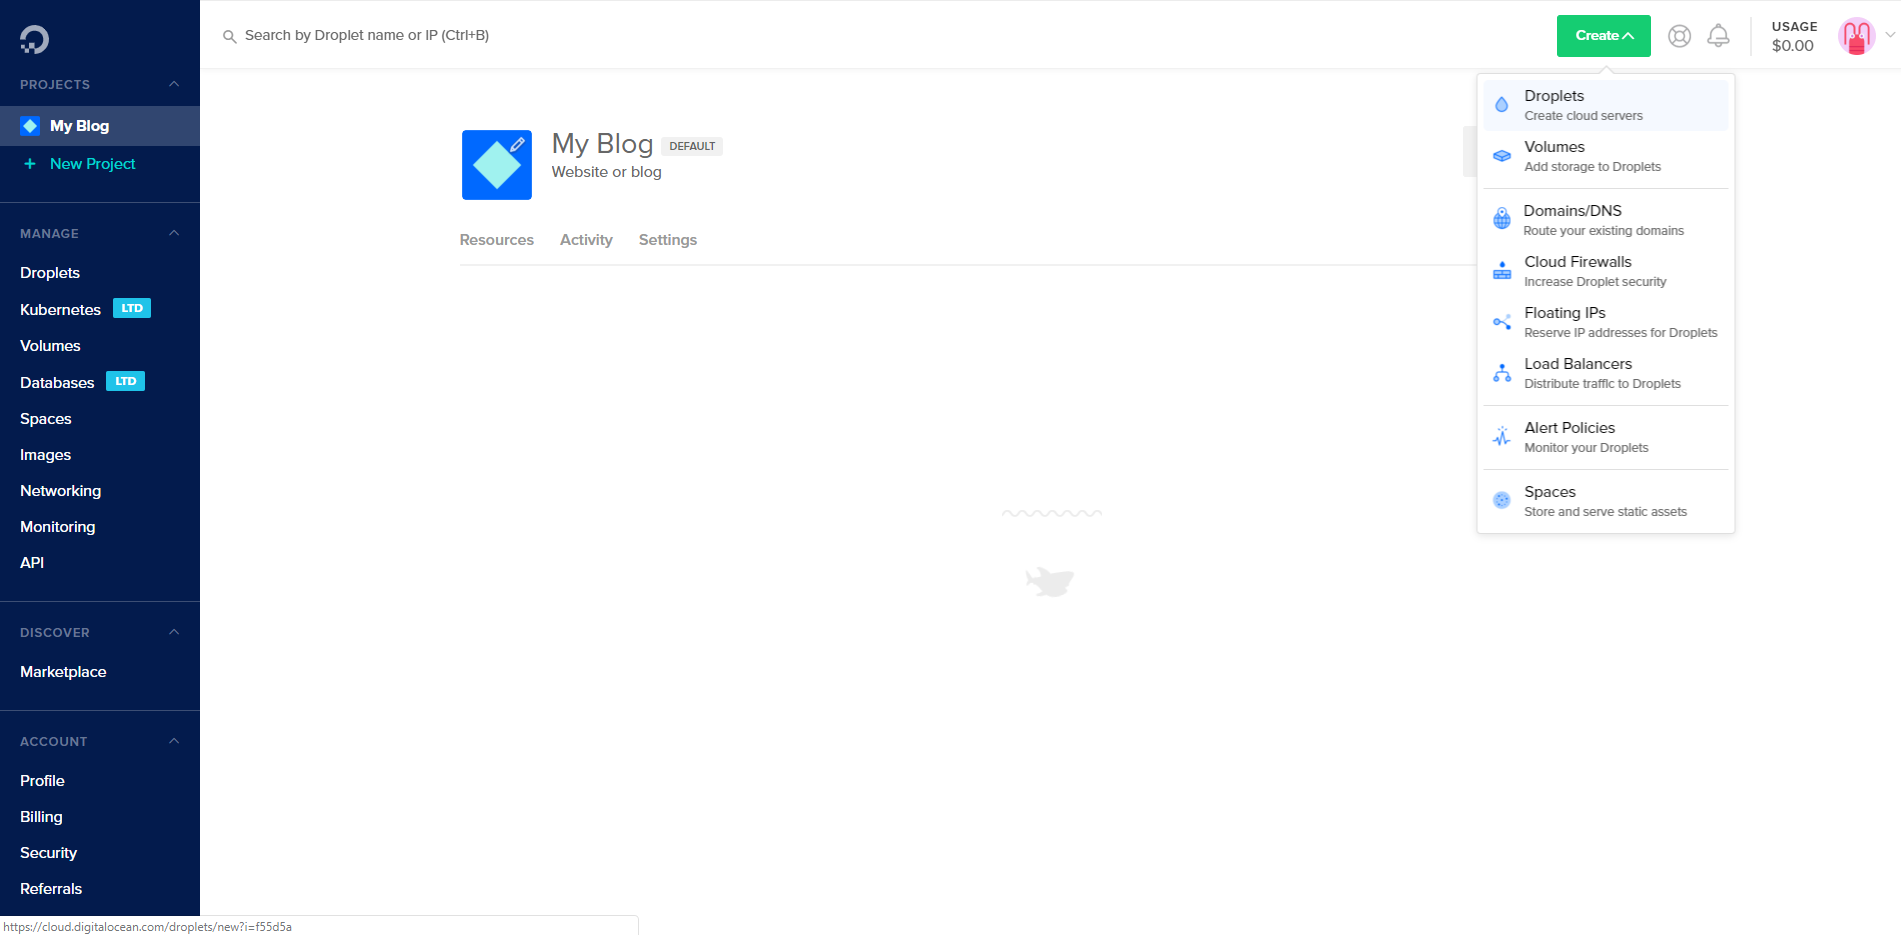
Once you’ve added your SSH key to your account, we’re ready to create the Droplet that will host your Ghost blog. You’ll want to click the green Create button and then click on Droplets in the drop-down menu.
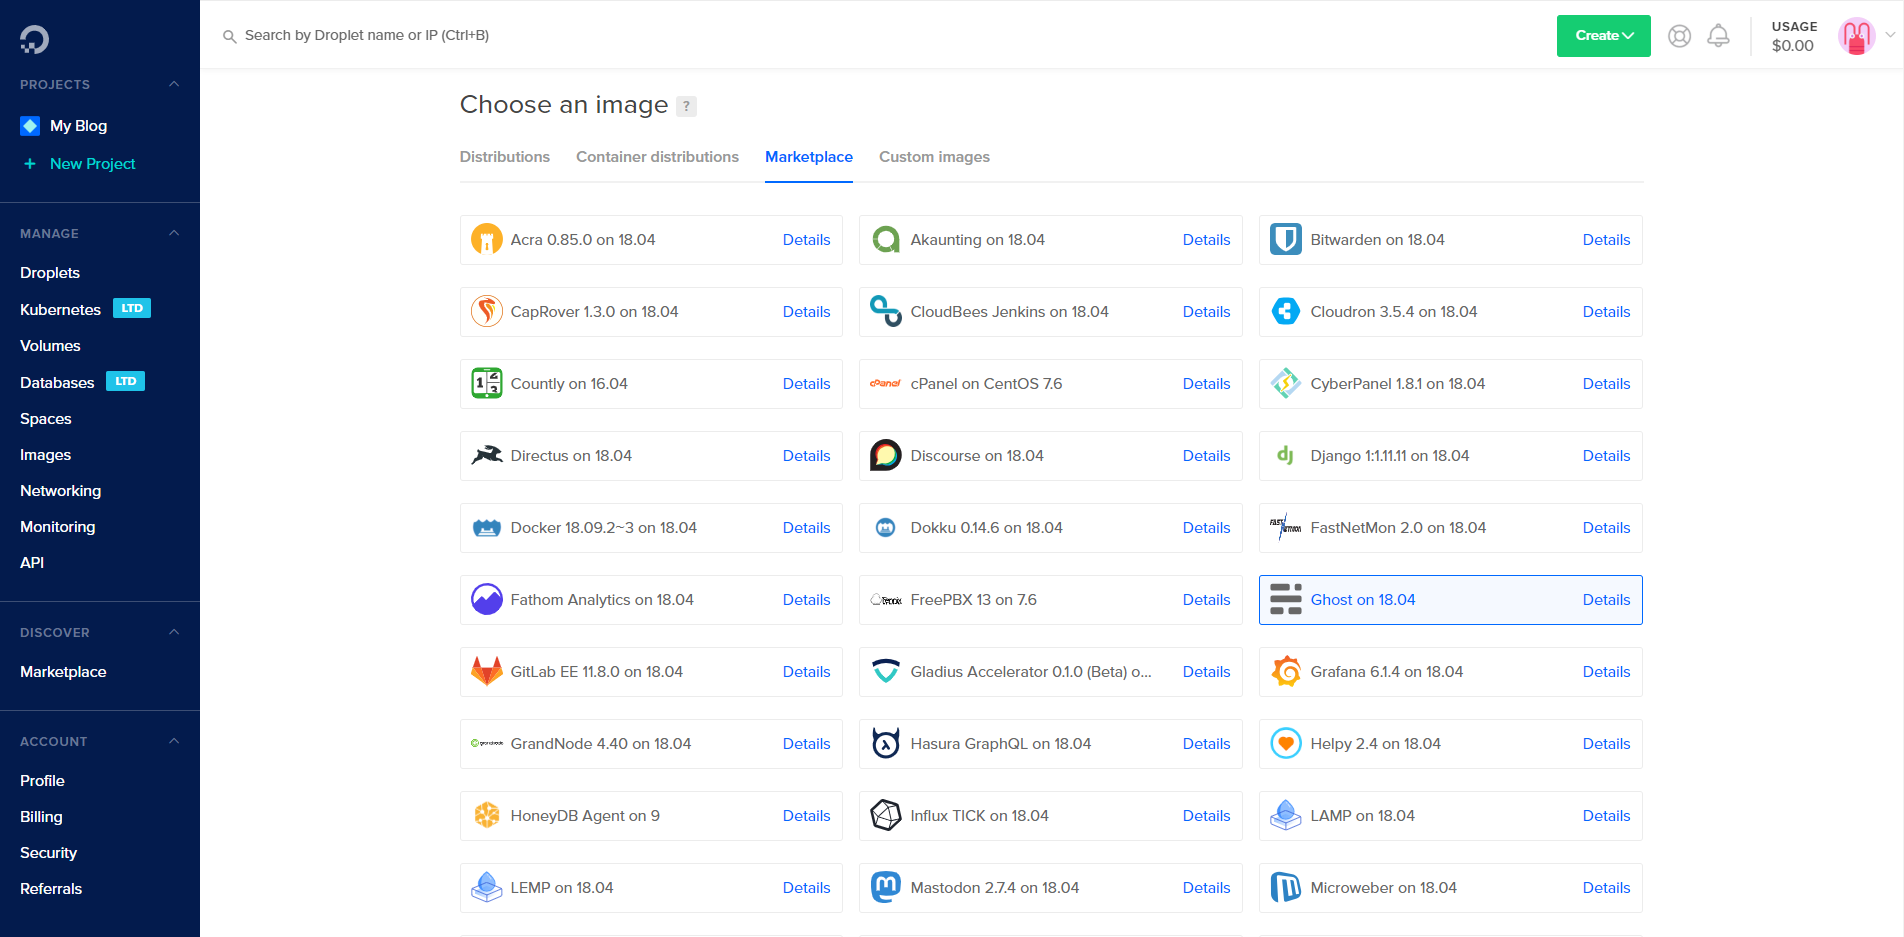
In the Choose an image section, click on Marketplace and then click on Ghost on 18.04. Below that you’ll see the Choose a plan section. Make sure to select the left most option in the list at $5/month. You can skip the Add backups and Add block storage sections, you’ll have the possibility to add those at a later time if you want to.
Next, you’ll want to choose a datacenter region that is close to you or your target audience. I selected Toronto since I’m in Canada. You can safely skip the Select additional options section. Again, you should have the opportunity to add those at a later time. In the Add your SSH keys section, select the SSH key you have created earlier on.
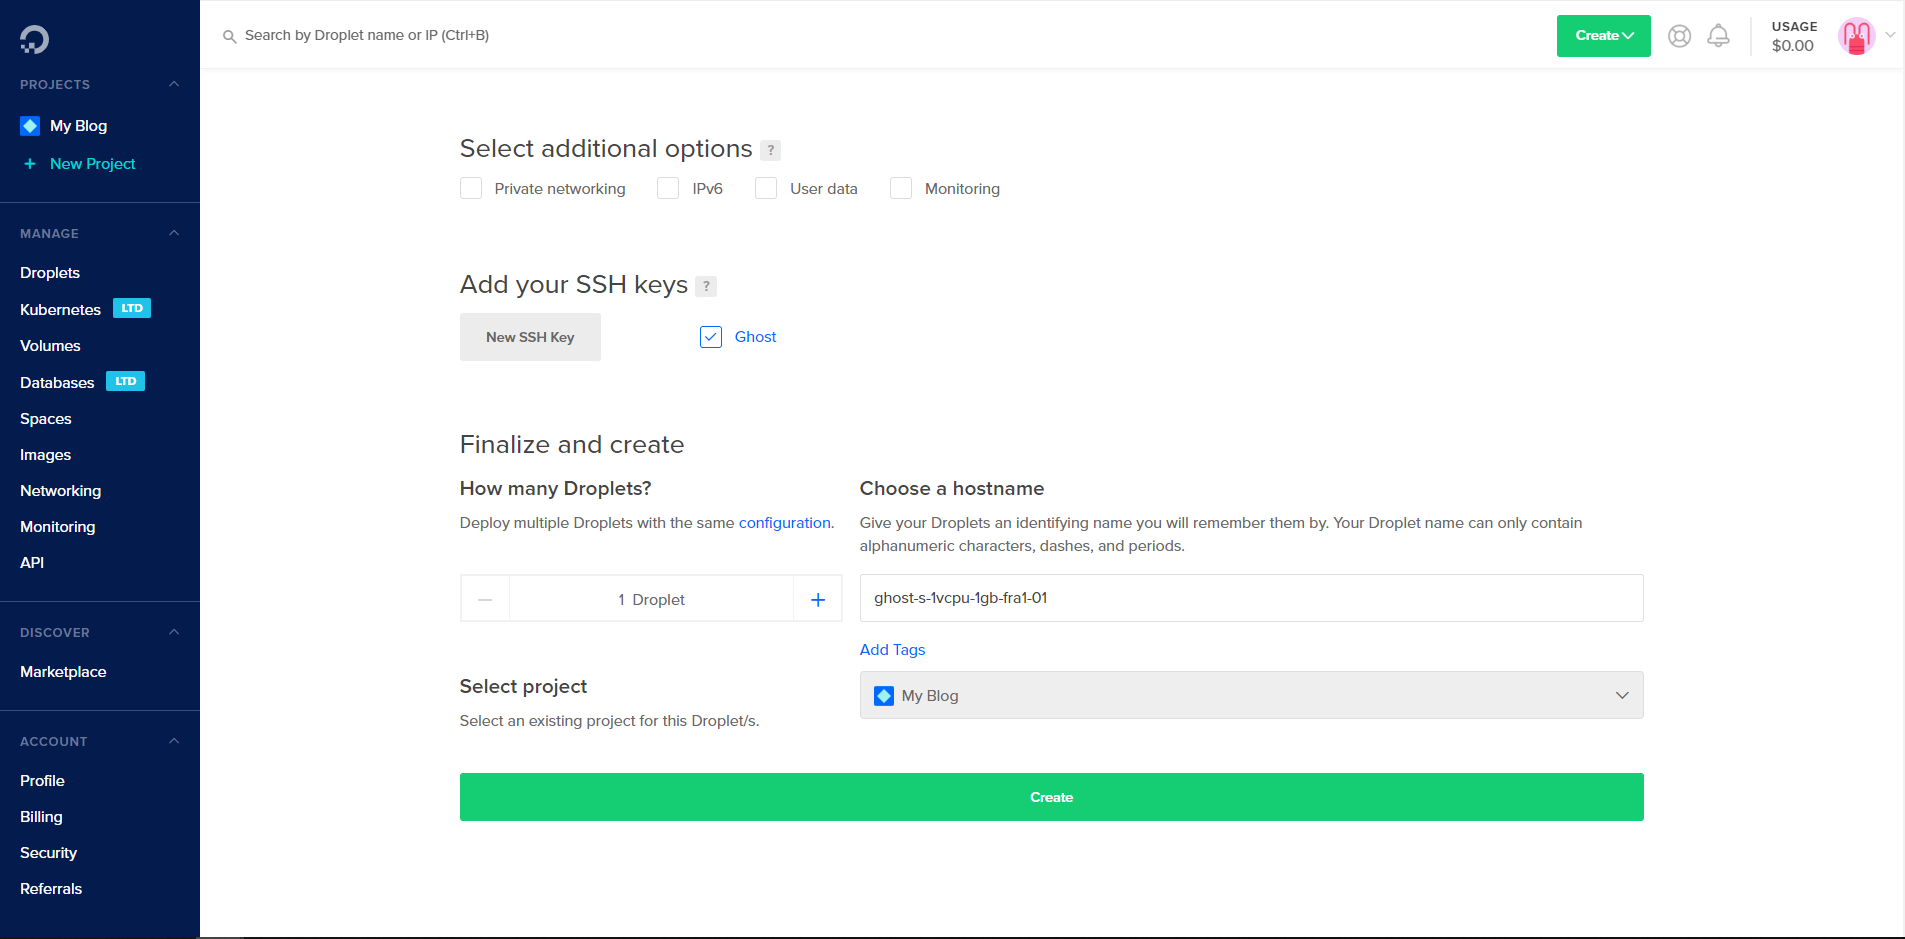
No need to change anything in the Finalize and create section. All that’s left to do on this page is to click the large green `create` button at the bottom. Wait a bit while DigitalOcean sets up your Droplet with everything you need to run Ghost.
3. Domain name
At this point, if you don’t already have one, you'll want to register a domain name for your blog. Doing this is beyond the scope of this article but Google is your friend here. Just search for "how to register a domain name".
After that you'll need to make sure that your new domain name points to your DigitalOcean droplet's IP address. This article can help if you've never done this before.
4. Setting up Ghost
After the Ghost One-Click Droplet is created and the domain and DNS records are set up, you’ll have to log into the Ghost Droplet to finish its setup. From a terminal on your local computer, connect to the Droplet as root. Make sure to use the IP address of the Droplet.
ssh root@use_your_droplet_ipImmediately upon log in, the Droplet will automatically make sure it’s running the most up to date version of Ghost, and will ask you to press ENTER to complete the setup.
Ensuring Ghost-CLI is up-to-date…
…

Ghost will prompt you for two details:

Your domain
Add an A Record -> your_droplet_ip & ensure DNS has fully propagated
Or alternatively enter http://your_droplet_ip
Your email address (only used for SSL)
Press enter when you’re ready to get started!
Follow the installation instructions to configure Ghost.
Once you’re done, make sure to configure the admin user using the administrative interface at http://use_your_droplet_ip/ghost (again, making sure to use the Droplet’s IP address in the URL). Until you configure the admin user, anyone who discovers the site can configure the administrative user, take control of the Ghost site, and potentially take control of the Droplet.
Once the installation and setup is fully complete, you can access the new Ghost site by visiting the Droplet IP address in your browser.
To upgrade or maintain the Ghost install in future, you’ll always have to become the ghost-mgr user in order to have the correct permissions:
sudo -i -u ghost-mgrAfter that, all tasks can be completed with the Ghost-CLI tool. Run ghost help for an overview of available commands, or check out the Ghost-CLI docs for full details.


Comments